Pages

Friday, March 30, 2012

RECIPE: Cinnamon Bun Muffins

I am ALWAYS on the search for new recipes for uses for cinnamon. Seems like I crave it more than any other seasoning or spice. I found this recipe on Elana's Pantry and just couldn't wait to try it! Who doesn't love cinnamon rolls!?
Cinnamon Topping:
  • DIRECTIONS:
  • 1. Preheat oven to 350 degrees.
  • 2. Combine almond flour, coconut flour, baking soda and salt in a medium sized bowl.
  • 3. In a large bowl combine oil, agave, eggs and vanilla. (I used my immersion blender)
  • 4. Blend dry ingredients into wet and spoon about 1/4 cup into greased or lined muffin cups. (I use my MISTO sprayer to lightly spray grape seed oil into silicone cups.)
  • 5. Spoon cinnamon topping onto the muffins.

6. Bake for 12 - 14 minutes on center rack of oven.
  • 7. Cool completely before frosting them with Creamy Cream Cheese Frosting
Makes 9 - 10  muffins
Creamy Cream Cheese Frosting
4 ounces Cream Cheese, softened to room temperature
3 tablespoons organic Agave
3 tablespoons Half and Half (The recipe calls for heavy cream, but we didn't have any. Half and Half works just fine!)

A dash of Cinnamon for good measure!

  1. To make frosting combine cream cheese and agave in a medium bowl until well blended
  2. Whip in cream until frosting is nice and thick
  3. Spread over Cinnamon Bun Muffins 
  4. Serve


RECIPE: Chocolate Coconut No-Bake Candy

First and foremost I want to say HAPPY 88th BIRTHDAY to my precious dad!! I wish we could be there with you today, but we just couldn't squeeze in a trip before we leave for Switzerland on Tuesday. We sent you a box of goodies for your birthday ... Enjoy! See you soon! We love you! (We live on opposite sides of the continent!)


About this recipe and the inspiration behind it ... 


One thing I remember vividly from my childhood was the ever-popular Friday lunch at school. Seems it didn't matter if it were 1 - 5 grade in Texas 6 - 12 grade in Tennessee. The one thing they all had in common was that dessert was chocolate oatmeal no-bake cookies. Even after I became an adult, those cookies (AKA Cow Patties) were always my favorites! I looked forward to hikes with friends because I'd make them to take along as a power snack. Perhaps it's a Pavlovian response, but everyone would call or email me to see if I'd be bringing a batch along. See? We may grow older, but we never grow up!
Since those wonderfully delicious taste sensations are made with tons of sugar and raw oats, they are totally off limits these days. However ... Last night I came across a recipe that brought on a most exciting "ah-ha" moment! The ingredients are Paleo, so I thought the final product might be a suitable replacement for that beloved childhood treat. Here's the link to the video I found: Video of Coconut Honey Candy for Easter
Here's the recipe for the version I came up with last night ...
CHOCOLATE COCONUT NO-BAKE CANDY
INGREDIENTS:
1/2 cup Honey
1 cup Almond Butter
1/4 cup Cocoa Powder
1 tablespoon Vanilla
1/2 cup shredded unsweetened Coconut
1/2 cup chopped Pecans
DIRECTIONS:
1. Line an 8" X 8" pan with parchment paper. I couldn't find mine, so I used "Press N Seal" with the sticky side down. It works GREAT!!
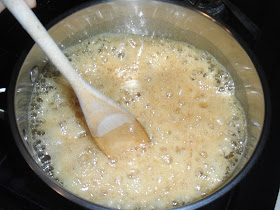
2. Pour honey into a saucepan and cook over medium heat, stirring constantly.
3. When honey boils, continue to stir constantly for two minutes.
4. Remove from heat. Stir in almond butter until it melts, then add cocoa powder and vanilla, stirring well. Add coconut and pecans, stirring well.
5. Once everything is well blended, pour into the lined pan and spread evenly. The mixture will be stiff, so use your fingers to press it into the corners, if needed.
6. Chill 30 - 45 minutes or until the mixture had sufficiently hardened.
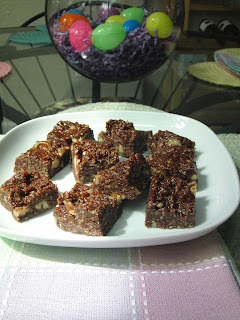
7. Remove from pan, peel lining off the bottom and place on a cutting board to cut into pieces. I cut 6 strips first, turned it and cut into 6 rows, making 36 candies.
8. These are best kept in an air-tight container in the refrigerator, but will remain somewhat firm if left out for an hour or so.


Thursday, March 29, 2012

RECIPE: Moroccan Marinated Pork Tenderloin

I often refer to Gavan Murphy's website for cooking adventure ideas. Two of my favorite dishes from his website are Orange-Ginger Pork and Moroccan Marinated Chicken. I decided to see how cooking a pork tenderloin would be with the moroccan marinade. The results? OUTSTANDING! I'm glad I doubled the recipe because now we'll have enough for several meals.
I paired it with some stuffed roasted zucchini. Excellent stuff!
***Please note***The meat must marinate for 4 hours, so there is preparation that needs to be done in advance.
MOROCCAN MARINATED PORK TENDERLOIN

INGREDIENTS:
1.5 pound pork tenderloin


Marinade:
1/2 cup Olive Oil
1/4 cup Red Wine Vinegar
1 1/2 teaspoon ground Cumin
1 1/2 teaspoon groung Coriander
2 teaspoons ground Cinnamon
1 teaspoon Sea Salt
2 teaspoons Lemon Pepper
1 teaspoon organic Agave
DIRECTIONS:
Preparing/marinating the pork ...
Combine the marinade ingredients together and blend well. (I used my immersion blender) Taste and set aside.
Preheat large skillet on high heat. Lay pork on foil or a paper towel then sprinkle with sea salt and black pepper. Add 1 tablespoon olive oil to hot pan, then add the pork to sear all sides. This should take 2 or 3 minutes per side. 

Once all the pork is golden brown, add it to the marinade and refrigerate for at least 4 hours.
Baking the Tenderloin ... 
***Allow the meat to return to room temperature to insure even cooking.***
Preheat oven to 400 degrees.
Place tenderloin on a foil-lined baking dish and place in oven. I doubled this recipe and it took 35 minutes, so be sure to start checking for doneness at about 20 minutes. 
I used my meat thermometer and checked the thickest part of a meat.  At 25 minutes the inside temperature of the pork was 139 degrees, so I returned the dish back to the oven for 10 more minutes. If you're checking with a meat thermometer you want the internat temperature to be 155 degrees.
Remove the dish from the oven and allow the meat to 'rest' for at least 3 minutes. This allows for the juices to be reabsorbed back into the meat for maximum juiciness.


Wednesday, March 28, 2012

RECIPE: Stuffed Zucchini

It's been a hectic day, but I still wanted to prepare a nice meal for us. I was a bit ahead of the game because I prepped a pork tenderloin yesterday afternoon and let it marinate all night and all day today. I'll add that recipe shortly, but I wanted to add this one before I forget what I did, since I didn't write it down!
STUFFED ZUCCHINI
INGREDIENTS:
2 medium sized Zucchini
2 large White Mushrooms
1/4 jar of your favorite marinara sauce
grated Parmesan Cheese
Italian Seasoning (I used Wildtree Italian Herb Blend)
Sea Salt
Pepper
 ... And after thought ... I added mushrooms!
DIRECTIONS:
1. Preheat the oven to 400 degrees.
2. Line a baking dish with foil.
3. Wash zucchini and cut them in half lengthwise.
4. Using a melon baller, scoop out the insides of the zucchini, reserving the scooped out goodness.
5. In a food processor, pulse the reserved zucchini pieces a few times until you have chunks. Repeat with the mushrooms.

6. In a medium sized bowl, add zucchini bits, mushrooms, sea salt, pepper, italian seasonings, 1 tablespoon parmesan, and red sauce. Stir well.
7. Place zucchini "boats" in the foil lined pan and scoop mixture into them, using all the mixture.


8. Place in oven and bake for 25 minutes.
9. Remove from oven, sprinkle parmesan cheese on top and return to oven for 5 more minutes.
10. Remove from oven. Plate. Serve. Enjoy!

Tuesday, March 27, 2012

TOOLS: Canisters

When you go in just about any store looking for canisters you generally find them in sets of four - An extra large one for flour, a large one for sugar, a medium sized one for coffee, and a small one for tea. What's up with that? Seems like they are right out of the 1950s when everyone "enjoyed" a danish, a cup of coffee, and a cigarette for dessert! Well, times have definitely changed, Aunt Mabel! 
So, one evening Conrad and I went on a search mission ... To find a set of canisters that would allow for Paleo ingredients to be displayed beautifully on the countertops in our otherwise "vanilla" kitchen. We went to Kohl's, Walmart, Target, the Dollar Store, Tuesday Morning, Bed Bath and Beyond ... Nothing. We went to SteinMart, Ross, and Marshall's ... Nothing. The last possible solution in our town was Michael's. A long shot, I know, but it was WELL worth the effort. BINGO! Square glass canisters in several heights!! Pretty much exactly what I was wanting. They even stack!
So, I did some figuring in my head and decided I could make do with 5 large, 5 medium and 5 small canisters. Well, I miscalculated, but no worries - I went back and got some more! So now I have most of the ingredients I use all the time nice and neatly displayed on my countertop. They are colorful and are constant reminders that we are eating much healthier than ever before. (I'm not saying we were ever really bad about eating junk food because we almost never go to fast food restaurants, but I was guilty of eating foods that didn't agree with my system.)
Here is a photo of our canister wall" as it is currently. 
Large canisters contain:
Unbleached Flour (Not sure why ... I sure don't use it!)
Coffee
Ground Coconut
Almond Meal
Raw Almonds


Medium canisters contain:
Flax Seed Meal
Coconut Flour
Walnuts
Pecans
Macadamia Nuts


Small canisters contain:
Sugar (I swear it's for making hummingbird nectar!!)
Splenda (Conrad uses it on grapefruit)
Arrowroot
Palm Sugar
Shredded Coconut
Dried Blueberries
Cried Cranberries
Dried Apricots
Dried Golden Raisins


I am very happy with how these turned out and have had several compliments about them when friends come over. I am considering placing all of the small canisters on a shelf above the large and medium ones. I've even bought the wood to make the shelf, but I still need to go get paint. 
One thing that's for certain ... Making a grocery list sure is a lot simpler!

RECIPE: Ultimate Green Smoothie

Ultimate. Green. Smoothie. Three powerful words make up an equally powerful nutritious drink! The ingredients are simple. The process is simple. The results are AMAZING!! Granted, this drink won't win any awards for it's beauty, but it tastes FAR better than it looks AND it's very healthy!!
INGREDIENTS:
1/2 cup unsweetened vanilla Coconut Milk
1/2 cup vanilla Greek Yogurt (I prefer ZOI)
1 ripe Banana
2 small Carrots (cleaned and cut into chunks)
1/2 cup frozen Blueberries
3 - 4 cups organic Spinach
1/2 teaspoon Pumpkin Pie Spices
1 teaspoon grated unsweetened Coconut
8 Ice Cubes
DIRECTIONS:
Place all ingredients in a blender and blend until smooth and creamy.

 Serve. Enjoy!

Monday, March 26, 2012

RECIPE: Herbed Parmesan Crisps

There are times when nothing but some crunchy, salty, crispy snack will do. I had one of those cravings the other day. I remembered making parmesan "chips" several months ago, so I decided to experiment ... again. I'm pretty sure this will be a repeat performance snack over and over again in our household ... I hope you will agree!
INGREDIENTS:
1/2 cup Fresh grated (not shredded) Parmesan Cheese
your favorite herbs (pepper, dill, italian seasonings, greek ... You choose!)
Olive Oil spray
DIRECTIONS:
1. Preheat your oven to 400 degrees.
2. Spray a light coat of olive oil on a cookie sheet. If you have a Silpat, use it. They work great for this!
3. Spoon 1 tablespoon of parmesan cheese on the pan, spreading it fairly thin. Repeat until you don't have any more room on your pan - Be sure to leave at least 1 inch between the crisps in all directions. (I also made some about the size of a half-dollar for snacking. They were wonderful, too!)
4. Lightly sprinkle the parmesan with your favorite seasonings. I ised a Greek seasoning, Italian seasoning, and Trader Joe's 21 Seasoning Salute. No need to use any salt as the parmesan will be plenty salty without any extra.

5. Bake on the center rack for 3 - 5 minutes. Be sure to watch them and pull the out when they are light golden brown. They will continue to pop and sizzle for a short time after you remove them from the oven.
 (The little crumbly bits are great as seasoning on salads, so don't throw them away!)
6. Repeat process until you have as many as you need/want. Trust me ... They will go fast!
They are wonderful served with salads or spicy dishes!

Saturday, March 24, 2012

NOT PALEO: Quick Chocolate Cake Treats

I am enjoying living the Paleo/Primal lifestyle so much more than I ever dreamed, and I am getting to the point where I feel guilty if I post a recipe that's not Paleo, but sometimes ya just have to cheat ... just a little. This recipe is NOT Paleo, but at least it's not as bad as just chowing down on a big cupcake or doughnut from your local bakery. This is a quick and easy recipe and stores easily for "emergency splurges". We have a 16 year old young man who is with us every other weekend. I always make healthy Paleo meals when he is here, but he doesn't follow the Paleo lifestyle at his mother's house, so I do what I can. I figured coming up with ideas like this will keep from having a whole cake sitting around ... Staring at me ... Tempting me ...
QUICK CHOCOLATE CAKE TREATS
INGREDIENTS:
1 box Angel Food Cake
1 box Triple Chocolate Cake Mix (or whatever flavor you choose)
Hershey's Chocolate Syrup
(Please don't cringe ... I'm going to try to find better solutions and would GREATLY appreciate your input and suggestions!)
DIRECTIONS:
1. Mix both cake mixes together and store in an airtight container.
2. Put 3 tablespoons dry mixture in a coffee cup.
3. Add 2 tablespoons water.
4. Mix well and microwave for 1 minute 15 seconds.
5. Turn out onto a plate and garnish with chocolate sauce, fruit, mint ... whatever you desire. 

Friday, March 23, 2012

TOOLS: Dishes

Several years ago we decided to replace our mismatched dishes. There's a Costco nearby and one day while browsing the aisles I noticed some dishes marked "Emeril Porcelain by Wedgewood". They were white. Plain. Perfect. Or so I thought. We took two sets of 6 home with us, unpacked them, washed them, and tried to stack them in our cabinets. Guess what? The dinner plate was too big ... The cabinet door wouldn't close all the way! I quickly discovered that they fit nicely on the center shelf, so that's where they'd stay. The set came with dinner plates, salad plates, soup bowls, dessert bowls, and large mugs. In hindsight, we realized they were all made for giants because all were quite large and would hold FAR more food than any one human should consume in a day, much less in one meal. 
A few weeks later we were at Ikea. They had white dishes that looked for all the world like our Emeril porcelain dishes, so we decided to get 12 of their dinner plates to use as an intermediate size ... One that we'd use more often. The Emeril dinner plates would be reserved for when we have guests and dine in the formal dining room. So, that worked for a while. The Ikea dinner plates are nice, but still a wee tad large, so we actually ended up using the Emeril salad plates as our everyday dinner plates and there's still room left on the plate once our meals are plated! 
So, the large mugs were an issue. I am not a coffee drinker, but Conrad is. The tiny coffee cups from the 1970s are simply too small, but these new Emeril mugs hold the entire contents of a can of Progresso soup with room left over! I found that World Market has white dishes that blend perfectly with our Emeril fine porcelain and our Ikea specials ... AND they had coffee cups that were just right! 
A new problem cropped up. If we used our smallest plates as our dinner plates, what could we use as dessert plates? Again, Ikea was the answer! They had bread and butter plates that would work perfectly. So, a dozen of them came home with us. 
What about a snack plate? Well, we didn't want to risk messing up (or breaking one of) a complete mismatched (yet perfectly matched) service for 12. so something else had to be found. During our next visit to Ikea we found some small, squarish plates that would be perfect for snacks or sandwiches or just about anything. They only had 6, so we bought them. At some point  might go get 6 more, but for now, I think we have PLENTY of dishes to go around.
And then there's the bowls. The soup bowls look more like pasta bowls ... You know, the one you'd serve pasta in? Well, we have 12 of them! I found bowls that look exactly like these at World Market. However, they are 1" in diameter smaller and hold a reasonable amount of food. We use them almost nightly with a spinach salad. 
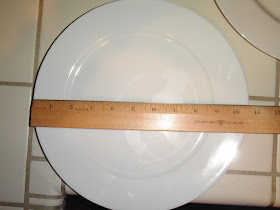
People tend to fill their plates with food, then feel bad if they don't clean their plate. With dishes as large as these there's no wonder obesity is such an issue! Below are photos of the plates. See for yourself how darned large they are! I used a wooden ruler to show the diameter of each piece ... 
The plates in order - smallest to largest:
7" diameter - Ikea
8.5" diameter - Ikea
9.25" diameter - Emeril by Wedgewood
10.5" diameter - Ikea
11.75" diameter - Emeril by Wedgewood

7" diameter - Ikea
8.5" diameter - Ikea
9.25" diameter - Emeril by Wedgewood
10.5" diameter - Ikea
11.75" diameter - Emeril by Wedgewood
The cups and bowls:
It's amazing how much difference there is in bowls that are only one inch different in diameter. 
The large one holds an entire large can of soup. The other holds about 60% as much!
 10" diameter - Emeril by Wedgewood
 9" diameter - World Market